Complete, Not Finished
The premise
There are two ways to call a painting done, and only one of them is the goal. “Finish almost implies a certain type of polish,” every form rendered out. Complete is different. “Complete means when it doesn’t need anything else.” A picture can be complete with a passage left raw, and it can be finished to a high polish and still be overworked. Overworking is the easy mistake, and he names it as one he actively avoids. So the target is sufficiency, not polish. When the painting doesn’t need anything else, stop.
Getting there is mostly connecting, not separating. “The end of a painting should be more about connecting it than separating it.” Early on you break the picture into local areas and solve them one by one; at the end you have to bring those areas back together, which is why “the beginning of the painting and the end of a painting you really should be thinking holistically,” and the middle is where you go local. A finish runs as a chain: “one series of adjustments will prompt another series of adjustments,” and it repeats “until you sort of don’t know what adjustments to make. That’s usually when the painting’s finished.”
The hard part is seeing when you are there, because your own eye goes blind to a painting you have stared at for weeks. So he games it. He finishes to about eighty or ninety percent and walks away for weeks, then looks fresh. And there is a trick under the walk-away: “There’s something about calling something finished that makes you suddenly see a bunch of fault in it.” He says it is done, looks at it as if he can no longer change it, and that shift shows him what he could not see while he was still making it.
The demonstration
Two figures show what finishing actually controls.
Four edge types, in master paintings puts the decision at the borders. A hard edge in Caravaggio, a firm one in Velazquez, a soft one in Sargent, a lost one in Rembrandt dissolving into the ground. Finishing is largely choosing which edges to harden and which to let go, and a lost edge only holds where the two families are already connected. That is connecting rather than separating, made literal at the line between two shapes. A lot of finishing, in his words, “is finding areas that the form is broken and building a bridge to connect it.”
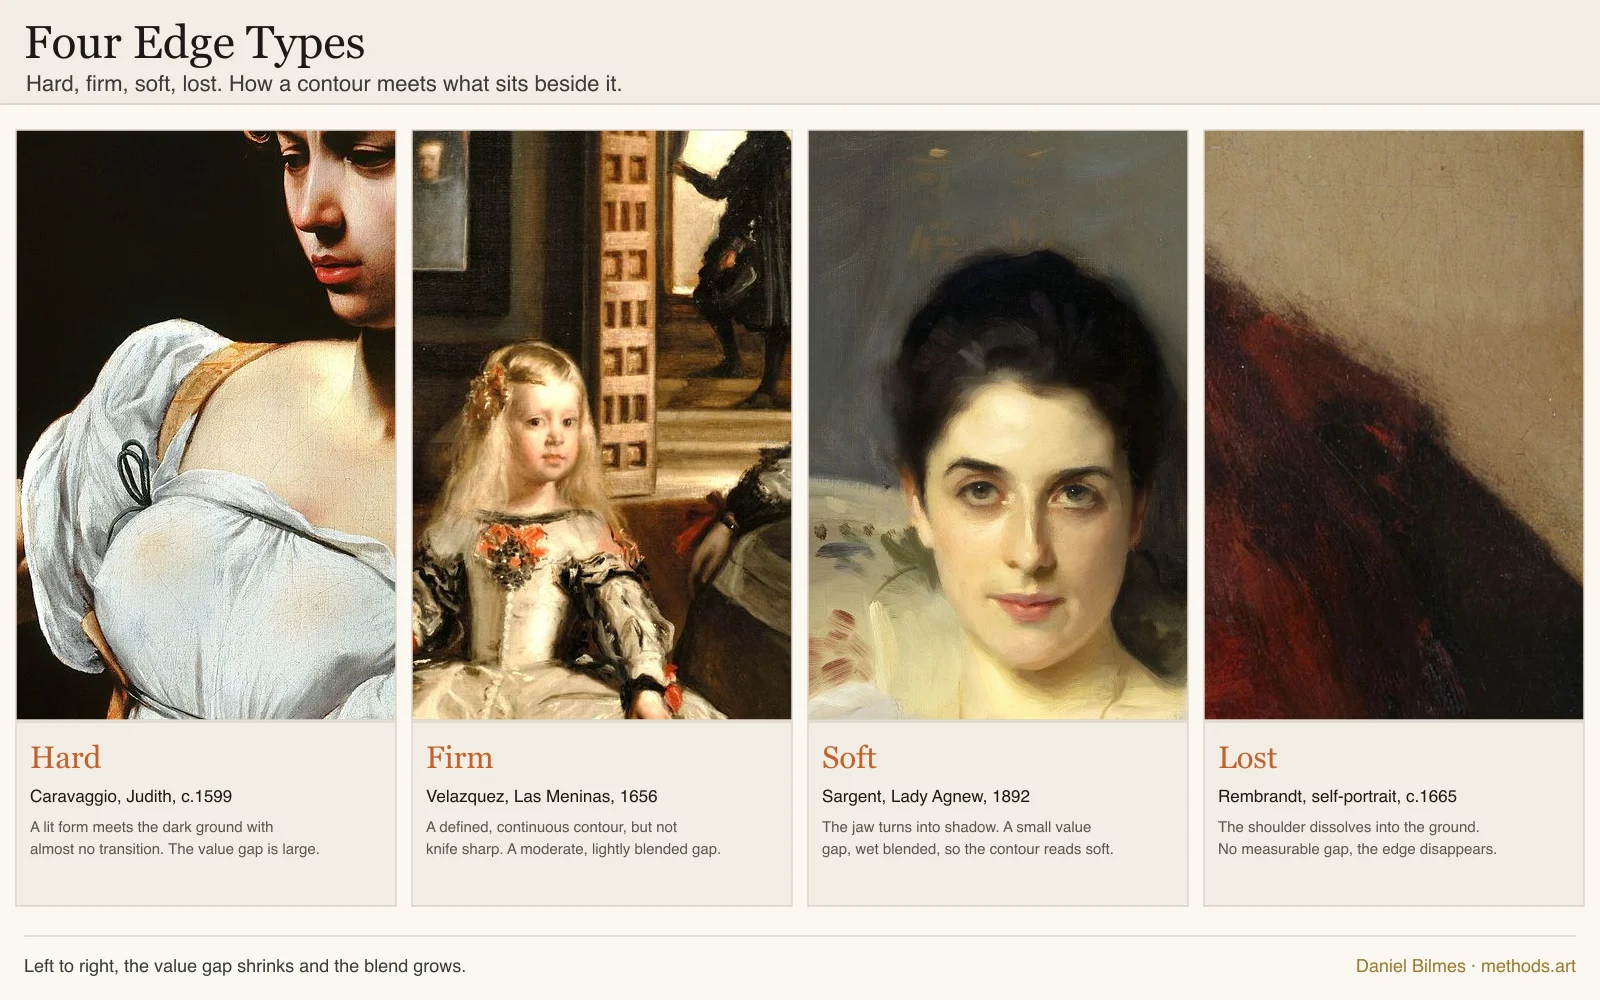
Public-domain painting details via Wikimedia Commons.
Four edge types, in master paintings. It also sits on the composition charts.
Tonal relationships, value is relative shows the finishing act at value scale. A value only reads against its neighbors, so a light left stranded in a shadow is “jumping out as if they’re not in the shadow.” It looks like it is “getting hit by light,” and that is “causing the form to break.” The finish is the hunt for those pockets, “finding those little light areas that shouldn’t be there and darkening them, not just glazing the entire area.” One line polices it, the tongue twister from Lesson 1 and Lesson 4: “The lightest lights in the shadows should be darker than the darkest darks in the light.” And the highlights get rationed, reserved “only for the snow-capped peaks,” never a whole lit plane, because a camera inflates highlights and copying them whole breaks the form.

An original methods.art diagram. Swatches are sRGB values; the demonstration follows the academic teaching that a value is read in relation, not in the absolute.
Tonal relationships, value is relative. It also sits on the color charts.
The master’s example
Two unfinished master paintings in the block-in figure show that finished is decided passage by passage, not poured over the whole canvas at once.
Leonardo left his Adoration of the Magi at the value block-in, the figures massed in brown monochrome before any color. A master’s picture stopped at exactly the stage Lesson 5’s first day ends on, and it still reads as a full composition. The block-in is a real, legible stage, not a scaffold to be hidden.
Velazquez takes it a step further on a single canvas. In his Peasant Girl the head is carried to a finish while the smock is left at the block-in, both stages sitting side by side in one picture. Whatever left it that way, the canvas shows finish as a local state, not a uniform coat: the head all the way there, the smock at the block-in, both true at once. It is the completion doctrine made visible. What a passage needs depends on the job it does, and a smock that reads does not need what a face does. Complete is when a passage doesn’t need anything else, and different passages reach that point in different states.

Value block-in, stage by stage. It also sits on the composition charts.
The exercise
This one is a finishing protocol, run on a study you already have. Pick an oil or acrylic study you left at roughly eighty or ninety percent, a piece that is close but that you never called done.
Part one, the call-it-done trick.
- Say out loud that it is finished. Then photograph it. Shooting the painting flattens it to one image and shows faults the easel hides. In his words, that is a final adjustment: “once I photograph it I’m sometimes not happy with it, so I’ll go back to it.”
- Looking at the photo as if you cannot change the piece, write down every fault you now see and everything you wish you had done.
- Go back to the study and do only those things. Nothing else. If a highlight needs re-asserting, use titanium white, not lead. His demo white is lead for how it glazes, and lead white is actual lead, never casual, with nothing in this drill needing it.
- Stop when you run out of listed faults. Resist adding a single mark that was not on the list, because “you don’t want anything superfluous, you don’t want to add information that’s not necessary.”
Part two, the fresh-perspective battery. Between passes, break your own eye loose. Hold the study to a mirror so it flips left to right. Turn it upside down. Set it in a different light than you painted under, and look again in the morning after a night away. Each one strips the familiarity that hides a fault. Then ask the only question that ends the drill: does it need anything else? If you cannot name a thing it needs, it is complete.
An hour of work spread across two or three sittings, because the walk-away is part of the method. What to look for: your finishing moves should connect passages, not fracture them. If the study looks busier than when you started, you finished past complete.
Self-check
- Name one thing the painting still needs. If you can, it is not done. If you cannot, “it doesn’t need anything else,” and you stop.
- Nothing superfluous. Point to your last five marks and confirm each added information the picture actually needed.
- Your finishing connected more than it separated. Any passage you broke apart at the end, you brought back together.
- The light pockets are gone and the tongue twister holds: the lightest note in your shadow is darker than the darkest note in your light.
- It survived a fresh eye. It held up in the mirror, upside down, and under a different light the next morning.
- Highlights sit only on the snow-capped peaks, not across a whole lit plane.